It’s Wednesday the 27th… so it’s time to share this season’s (completely unofficial) Pinterest Challenge project (not sponsored by Pinterest or anyone else, just dreamed up by Katie to make us stop pinning and start doing). Huzzah!

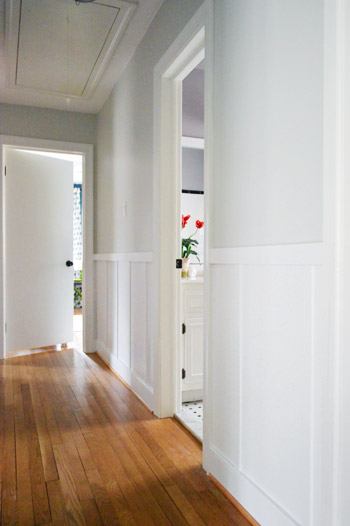
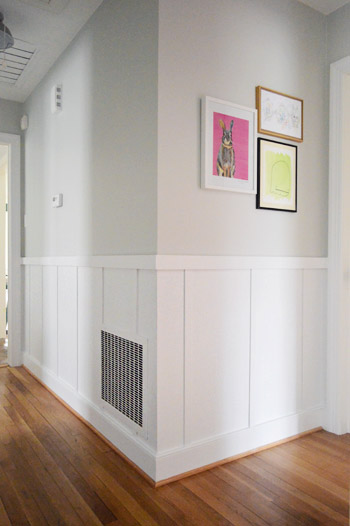
And this season’s challenge was the biggest one we’ve tackled by far. We tried our hand at adding some character with some easy board & batten in our formerly bare hallway.
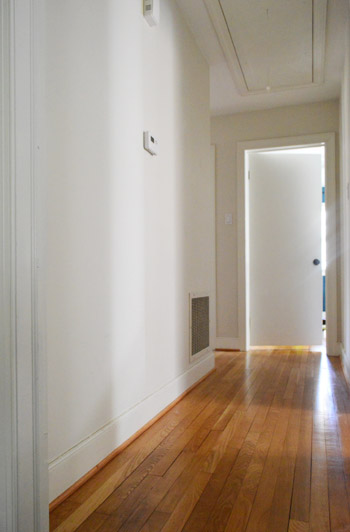
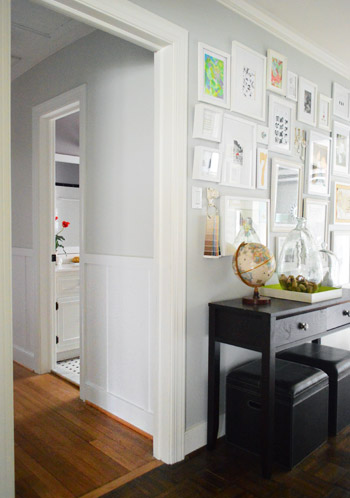
Which now, a week later, is looking like this. Woot!

Is it weird that I’ve been sitting on the floor just staring at it?
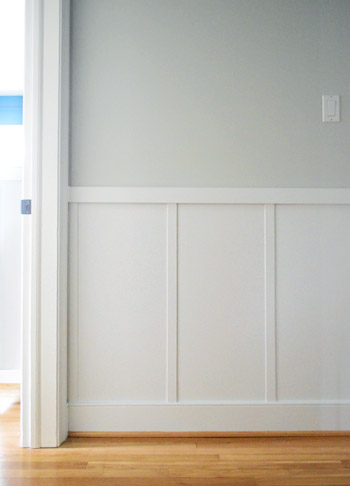
A few folks who had already installed board & batten or wainscoting commented last week to say that pictures don’t do it justice and they’re right. Photos are flat. But in person it’s just so dimensional. It really adds a ton of polish and interest to a formerly drab little hallway that we walk through dozens of times a day.
And when it came to how we got ‘er done, there’s thankfully no shortage of tutorials on the subject. So as per the challenge rules, I took inspiration (or Pintspiration, har-har) from a few awesome board-&-batten-tackling bloggers out there, and then we did own spin. Still have some more art to hang of course…
Here’s a rundown of the tutorials that we read before we took a crack at it:
- This one from Ana at Ana-White
- This one from Sara at Thrifty Decor Chick
- This one from Kate at Centsational Girl
- This one from Emily at Decor Chick
We’ll be back tomorrow with a full tutorial (including a video of each and every step!). We just have to get that all together (we were rushing just to take the photos for this post by today, so we didn’t have time to edit the video and write out the full step by step tutorial). The good news is that although the project took us nearly the full week that we allotted for the challenge, none of the steps were too hard by themselves, so it’s one of those projects that anyone can tackle as long as you take it one step at a time. And although we’ll be back with more details tomorrow (and a video of our entire process) our general order of the steps was this:
- measure & gather materials
- mark, level, and attach the top rails
- nail and glue the battens
- fill the wood holes and caulk the cracks
- sand the holes we filled and prime all of the wood
- paint the wood and the walls below the rail white
- paint the walls above the rail your color of choice (doing this beforehand is even easier)
As for what color we went with on the walls, we thought the same soft platinum gray color (Moonshine by Benjamin Moore) that’s in our adjoined frame hallway would make for a nice cohesive and open feeling (we worried that anything too dark on the walls would close in the small hallway too much). We really love how it accents the white board & batten effect on the bottom without being too high-contrast. It’s a soft tone-on-tone look for sure, and the dimension in the board & batten adds so much interest. Note: you can see in this pic that we still have to paint the trim in the frame hallway so it’s pure white like the board & batten.
We’ll have a full budget breakdown for you tomorrow too (still have to go through those receipts!). Seriously, the paint was still drying when we grabbed these after pics for you, so we can’t wait to sit down and write up all the hows and the whys. But anyone can do this! It took a fair amount of time, but nothing was too complicated. Thank goodness or it would have been the first Pinterest challenge that we didn’t actually finish. Haha!
Don’t forget to check in on Katie, Megan, and Michelle to see what awesomesauce projects they’ve whipped up (they’ll all be sharing theirs sometime today as well)!

And now here’s the part where we tip our homemade hats to you guys and invite you to share all of the fun Pinterest Challenge projects that you’ve tackled in the last week (right along with us, well at least virtually with us). If you’ve already blogged about it, just:
- click on the blue “Add Your Link” button with the odd cartoon head at the bottom of this post (you might have to do some scrolling, depending how many projects are added)
- add a link to your specific blog post about your project in the url field (not your home page)
- where it says “name” write a descriptive name for your project (ex: “Homemade Leaf Wreath”) as opposed to your actual name
- we’d also love if you could quickly link back over to our project posts within your own (here’s Katie’s, Megan’s and Michelle’s) – it’s also nice to link to your inspiration project on Pinterest as well as to directly link to the original project/site, just so they get some love too.
And if you’d rather just link over to your project in the comment section, feel free to do that – or even add a link to a free photo sharing site like Flickr with your pics if you don’t have a blog (remember to set the gallery to public so we can all see it). I’m waay too excited to see what you guys have been up to! Seriously, Petersik. Calm down.

Kristen | Popcorn on the Stove says
It looks great! I think it really changes the game for that hallway!
Anele @ Success Along the Weigh says
OH. MY. GOODNESS!! It looks sooooo good! I’d sit on the floor and stare at it until my eyes glazed. Now I’m off to check off the other girls stuff! Great job guys! (As usual!)
Emily says
Wow! You guys did an amazing job. Board and batten adds class and dimension to any space. Bravo! I can’t wait to see your how-to. We will be putting beadboard in our kitchen soon and I need all the help I can get! :)
sistersunnie says
Wow! Realy nice!
Kate says
I can’t see the blue button from my browser so here’s my link. I love the Pinterest Challenges and your hallway looks fab!
http://theloudandclear.com/2013/02/26/diy-hallway-stencil-follow-up/
Courtney says
Looks wonderful! Great job guys.
Crystal says
WOW it looks amazing, I love it!
Kara says
I LOVE it!! Such a great addition.
Julia @ Chris Loves Julia says
Soooooo beautiful. And it doesn’t matter how many house tours I’ve seen, I am always surprised when I discover (or realize?) where things are. Like, Oh! There’s that little hall bathroom with the purply walls. Looks great, you guys!
YoungHouseLove says
Aw thanks guys! We were so excited to share it with you today!
xo
s
Kelli @littlecottageofmine says
Wow! Fabu! Looks good!
Erin {Home Everyday} says
The board and batten looks amazing! It is so fresh and so clean, clean. Do you guys know how I would do this up a set of stairs?
YoungHouseLove says
Oh my gosh, I think that would look so pretty! Check Pinterest for some images (I think I’ve seen a bunch) and then I’d just try to map it out with tape on the wall (just to get the angle right, but if you follow along with the stairs and keep the height consistent all the way up it would be gorgeous!
xo
s
Kim@NewlyWoodwards says
Thank you so much for hosting this challenge. I should just block off my day to look through the links.
I love your board and batten. I’m a bit of a b&b addict. We started with our dining room in the last house, and now we’ve got it in the dining room at our new house, along with the stairwell, living room ceiling and bath. It’s addicting.
Annabel Vita says
I’ve been so excited about this update and it didn’t disappoint! I made a pair of tiny baby trousers for my challenge and got kermit the frog to model them for me!
http://www.annabelvita.com/2013/02/27/baby-trousers/
Jess @ Little House. Big Heart. says
It looks great!! I really, really have some board-and-batten envy going on! We’ve been wanting to do this in our dining room and/or hallway for a long time!
This time around we built a table for our new patio!
http://littlehousebigheart.com/2013/02/27/lets-table-this/
YoungHouseLove says
Love all the links you guys are sharing today! Wahoo! Bring on the eye candy…
xo
s
Haeley @ Design Improvised says
What a transformation a little board and batten can make! Such a great way to upgrade a hallway. We have board and batten in one room of our house (previously the office, then nursery, now playroom!) and it is my favorite room in the house because of it!
Katie says
It looks awesome!! Love it! We just put up board and batten in our master bathroom. It’s such a great look! :)
Chelsea @ two twenty one says
Looks awesome, guys! It definitely adds character to the hallway. You’re more than welcome to stop by my house and help me out with some board and batten.
Thanks for hosting!
YoungHouseLove says
Haha, we’ll be right over!
xo
s
Sara says
Looks so good, guys! I actually had a dream last night that you painted the hallway navy, ha! ;)
YoungHouseLove says
That’s funny! John was just talking about a navy color in the kitchen last night- maybe you heard him!
xo
s
Diane @ Vintage Zest says
I’ve never added a project before to one of these link things, but I have the perfect one to add! Yes!
Erin@Managing the Manor says
It looks awesome! Great job with the wainscote, and thanks SO much for hosting!!
Shannon says
I LOVE it!!! It looks incredible!! :) You two never cease to amaze me!
I had so much fun with the Pinterest challenge! I actually BUILT something with my bare hands for the first time!!! :)
http://fabulouslyvintage.blogspot.com/2013/02/pinterest-challenge-diy-herb-planter-box.html#
Caitlin @ Desert Domicile says
Wow, your hallway looks so great! I too find myself wanting to sit around and stare at my project haha I DIY’d a trunk coffee table for our loft (http://www.desertdomicile.com/2013/02/winter-pinterest-challenge-diy-trunk.html) and catch myself wandering upstairs just to look at it!
Wendy @ New Moms Talk says
Thank you for hosting the challenge.
I really didn’t think there’d be time to complete a project, but I couldn’t let it go.
The result is that I was able to complete a 0 dollar (yes, not a penny spent) project for something that our little girl loves!
Bonus- it’ll heading with us as we get our travel on!
Thanks again!
YoungHouseLove says
Aw, you guys are so much fun! Thanks for playing along with us and sharing all of your projects :)
xo
s
Whitney says
Oh this is beautiful! It was the perfect way to add interest to a part of a home that most people would just ignore! We have a hall that’s too narrow to do a gallery wall, and I’ve been trying to decide how to spice it up. This may be just the thing! Awesome job! And thank you for hosting this challenge, I get SO excited each time to be a part!
Jen W says
that looks great! Nice work!!
Krystle @ Color Transformed Family says
It turned out great. Definitely better than just a plain hallway. I would love to do something like this to our bathroom someday. Totally worth all the effort you put into it.
Ashley@AttemptsAtDomestication says
Oh it looks amazing! I absolutely love it! And I love what it adds to the hall! Definitely visually interesting, but not overwhelming!
Can’t wait for tomorrow’s tutorial!
Lisa E says
Looks great. Wish I had your energy! Am I correct in that you have to have a blog to link up to this?
YoungHouseLove says
The last paragraph of this post before the link-up it explains how anyone can link to a free Flickr album in the comments to share if you don’t have a blog. Hope it helps :)
xo
s
Lisa E says
Don’t you just hate when people don’t pay attention?! LOL! Sorry, I missed it. Thank you!
YoungHouseLove says
No worries at all! It’s buried in there :)
xo
s
audrey h says
I would love to do this in my upstairs hall, but I have “bumpy” (textured plaster) walls. Has anyone else successfully done this in the same instance?
YoungHouseLove says
Oh yes, read Kate’s tutorial that we linked to in this post for textured walls (she used board on the bottom for a smooth surface).
xo
s
Crystal @ 29 Rue House says
It looks fantastic guys!! Nothing like a little pressure of a Pinterest Challenge to get things done!
P.s. When I read “Pinspiration” I heard “Perspiration” in my head…LOL
YoungHouseLove says
Hahah! There was definitely some of that too!
xo
s
Sarah says
Whoa that looks AMAZING!! I’m dying to do something like this in our dining room, can’t wait to see your tutorial!
Lisa says
Can I please come over to pet your new B&B walls? I promise not to get in the way and keep my fawning volume to a minimum. ;) They’re beautiful!!
?
L
YoungHouseLove says
Haha, sure! Come on over and join me as I whisper sweet nothings to the hallway. Haha!
xo
s
Allison Jabaay says
That turned out awesome! What a big improvement for the space! I can’t believe how fast you were able to finish it on top of everything else you guys do.
Thanks for the challenge, too. I enjoyed checking a couple things off of my house to do list.
Anne @ Planting Sequoias says
I LOVE your board and batten! We just did this to my parents’ new bedroom and went up the wall 3/4s of the way to let their dark wood antique furniture really stand out against it–and it looks great, if I do say so myself.
P.S. I think you should do a sweet stencil/something unexpected on your attic door–perhaps herringbone like Mandi at Vintage Revivals did on her ceiling?
YoungHouseLove says
That’s fun!
xo
s
cassie {hi sugarplum} says
This looks great — you guys really killed it! I did a very basic version…skipping the batten part here: http://hisugarplum.blogspot.com/2012/12/mudroom-complete.html
For anyone who’s looking for an even easier, cheaper method. All it is are the thin boards attached vertically, and a piece of trim horizontally. My walls are even textured.
Thanks so much for the link party…this is def my favorite, so many amazing, inspiring ideas in blogland!
xo. C
YoungHouseLove says
Really cute!
xo
s
Amber @ Wills Casa says
It looks amazing! Crazy how much it made the hallway look complete and cozy. Love it!
andrea @ my kinda perfect says
looks gorgeous!!! i love how it adds such character!
great job petersiks! =)
Karah @ thespacebetweenblog says
Hey good lookin’! That’s me talking to your hallway … not that you too aren’t good lookin’, too … but that board and batten is awesome! I love the textural interest it adds. And thanks so much for the party … my very first blog post was for a Pinterest Challenge (fall 2011) so every time around I feel like I’m coming home. :)
Melissa S. says
The hallway looks GREAT! I’m looking forward to your tutorial tomorrow. We have a miniscule hallway, so I think this is a project I’d actually be able to tackle on my own.
Tanya from Dans le Townhouse says
Wow!! That looks fabulous. I totally understand the sitting and staring at a project that has turned out so well. It really adds a lot of character.
Thanks for the fun Pinterest Party! Sherry, I thought you might get a kick out of my project: I dyed a dress! Your wedding dress turned out so well, I felt emboldened to dye a drab dress I had in my closet.
http://dans-le-townhouse.blogspot.ca/2013/02/pinterest-challenge-diy-dyed-dress.html
YoungHouseLove says
Looks awesome!
xo
s
Urban Wife says
Love it, love it, LOOOOVE IT! Adding dimension to flat spaces is always fun! Fabulous job, y’all. :)
Katja @ Shift Ctrl ART says
That board and batten looks amazing!! I am sending this link to my friend who is putting it up in her new house right now. I love how it turned out.
Thanks for doing these challenges. I really enjoy participating in them.
And THANK you for the “Petersik bump”! Colbert has NOTHING on you ha ha :)
Gretchen@BoxyColonial says
Looks great! We just did our first board and batten in our master bedroom/nursery a couple of months ago. I agree with your assessment–tedious but not really hard–and it makes such a big difference!
Michelle says
looks awesome! can you guys explain the reason for the light brown trim underneath the white trim in the B&B hallway? and then it looks like you have dark brown trim under the white trim in the frame hallway? What is the function of this extra little piece of trim? probably a stupid question but looking around my apartment, we don’t have that! We just have one solid piece of trim (probably 2-3 inches wide).
love the hallway :)
YoungHouseLove says
That’s just the way it is throughout our house (some people paint quarter round to match their molding and other people leave it to match their wood floors, which tends to hold up to scuffs and hide hairs/dirt a wee bit more).
xo
s
michelle says
Thanks! That makes so much sense. I figured the answer was just as easy as that :)
Kimberly says
It looks awesome! How does Clara like it? I can picture my daughter rubbing her cheeks on them… okay, I would be doing that too.
YoungHouseLove says
This is her exact reaction after we hung the rails and battens and she woke up to see them: “Wow! It’s beautiful! Did a man come while I was sleeping and bring that?” – she totally didn’t give us credit for it! Hahahhah!
xo
s
Cindy * Daisies & Crazies says
A big HAHA to Clara’s reaction!! Doesn’t she know better by now?! ;) xo
YoungHouseLove says
Isn’t that hilarious? We think it’s because that morning the heating guy came with an oil delivery for us, so she remembered a man coming to help with something and assumed he came back to do the hallway! Haha!
xo
s
Kimberly says
Haha! If only people came while we were sleeping to spruce things up. My floors could definitely use a good scrub, maybe if I go to sleep someone will come and clean them. I will call him the DIY Santa :D
YoungHouseLove says
Amen!
xo
s
Devon @ Green House, Good Life says
Just out of curiosity — how much does a delivery of oil cost, and how long does it last? I’ve heard oil heating is crazy expensive.
YoungHouseLove says
Thankfully our system is just a “backup oil” system, so it usually runs without using any oil. It’s around $500 for a delivery and we probably get one every 2 years (didnt get any last year at all).
xo,
s
Karen says
So many clever ideas, and we’ve only just begun (channeling my inner Karen Carpenter). Thanks for hosting…you guys are a total inspiration!
Heather says
I know its new but it looks like its been there or supposed to be there if that makes sense….It looks great! Awesome job!
YoungHouseLove says
I feel the same way! It totally makes the house feel more authentic even though it’s brand new!
xo
s
Sara @ Mom Endeavors says
Your hallway looks great!! Thanks so much for hosting! This was a great excuse to get some Pinterest projects done!! :)
Cindy * Daisies & Crazies says
It looks great, you guys! This is a project I have on my list for someday. I excitedly linked up to you for the first time on this challenge!
xo
Lauren says
Wow, looks awesome! I’m obsessed with board and batten. That was our first project when we bought our house in November 2011 in the dining room. It took us forever, but mostly because my husband also did three door casings! Will have to blog that one sometime. Maybe when I get around to convincing him we should also do it up our stairwell and in the half bath too :)
Thanks for hosting! I linked up above; it was nice to have this challenge to inspire me to complete a detailed tutorial. This one is for a sewing machine scrap catcher. Hoping to be adding many, many more tutorials in the future :)